บทความ

งานปฏิบัติ 13

รูปภาพ
งานปฏิบัติ 13                                                                   DIR Sensord Code 1 #include <LiquidCrystal_I2C.h> LiquidCrystal_I2C lcd(0x27,16,2); int PIRpin = 8; void setup() {   lcd.begin();   pinMode(PIRpin,INPUT);   lcd.home();   lcd.print("Waiting for PIR");   delay(10000);         lcd.clear(); } void loop() {   int x = digitalRead(PIRpin);   lcd.home();   lcd.print("PIR = ");   lcd.print(x);   delay(100); }

งานปฏิบัติ 12

รูปภาพ
งานปฏิบัติ 12                                                     วัดระยะทางด้วยอัลตร้าโซนิก HC-SR04 Code 1 #include <LiquidCrystal_I2C.h> LiquidCrystal_I2C lcd(0x27,16,2); int triggerPin = 13; int echoPin = 12; long duration,distCM,temp_distCM=0; void setup() {   lcd.begin();   lcd.setCursor(0,0);   lcd.print("Dist =      cm");   pinMode(triggerPin,OUTPUT);   pinMode(echoPin,INPUT); } void loop() {   digitalWrite(triggerPin,LOW);   delayMicroseconds(2);   digitalWrite(triggerPin,HIGH);   delayMicroseconds(10);   digitalWrite(triggerPin,LOW);   duration = pulseIn(echoPin,HIGH);   distCM = duration/58;   if (temp_distCM != distCM)   {     lcd.setCursor(7,0);     lcd.print("    ");   }   lcd.setCursor(7...

งานปฏิบัติที่ 10

รูปภาพ
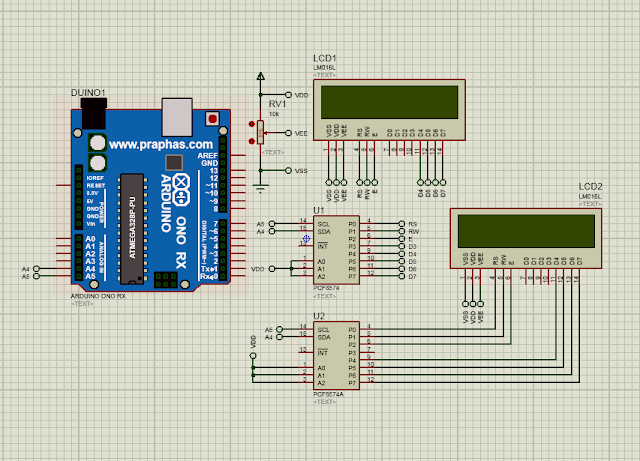
งานปฏิบัติ ที่10 รูปที่ 1 Code 1 #include <Wire.h> #include <LiquidCrystal_I2C.h>  LiquidCrystal_I2C lcd(0x27,16,2); void setup() {   lcd.backlight();   lcd.begin();//LiquidCrystal_I2C } void loop()  {   lcd.setCursor(0,0);   lcd.print("Hello LCD I2C");   lcd.setCursor(0,1);   lcd.print("Pattayatech"); } Code 2 #include <LiquidCrystal_I2C.h>  LiquidCrystal_I2C lcd(0x27,16,2); int x=48; int y=-79; float z=8.74586;  void setup() { lcd.begin(); } void loop()  {   lcd.setCursor(0,0);   lcd.print("x = ");   lcd.print(x);   lcd.setCursor(8,0);   lcd.print("y = ");   lcd.print(y);   lcd.setCursor(0,1);   lcd.print("z = ");   lcd.print(z,4); } Code 3 #include <LiquidCrystal_I2C.h>  LiquidCrystal_I2C lcd(0x27,16,2); byte heart[8] = {0x00,0x0A,0x1F,0x1F,0...

Mini Project

รูปภาพ
Mini Project พัดลมเปิดปิดอัตโนมัติควบคุมความเร็วตามอุณหภูมิ-4ระดับ อุปกรณ์ 1.เซ็นเซอร์วัดอุณหภูมิ 2.Arduino 3.LCD 4.LED 8ดวง 5.DriveMotor Wiring diagram Block Code #include "DHT.h" #include <Wire.h> #include <LiquidCrystal_I2C.h> DHT dht; LiquidCrystal_I2C lcd(0x27, 16, 2); void setup() {   lcd.begin();   Serial.begin(9600);   Serial.println();   Serial.println("Status\tHumidity (%)\tTemperature (C)\t(F)");   pinMode(10,OUTPUT);   pinMode(11,OUTPUT);   dht.setup(2); // data pin 2   pinMode(3, OUTPUT);   pinMode(4, OUTPUT);   pinMode(5, OUTPUT);   pinMode(6, OUTPUT); } void loop() {   delay(dht.getMinimumSamplingPeriod());   float humidity = dht.getHumidity();   float temperature = dht.getTemperature();   Serial.print(dht.getStatusString());   Serial.print("\t");   Serial.print(humidity, 1);   Serial.print("\t");   Serial.print(temperature, 1 );     ...
รูปภาพ
งานปฏิบัติ 9 wiring diagram🔻 Code 1🔻 #include "LedControl.h" #include "Keypad.h" #define C4  262 #define D4  294 #define E4  330 #define F4  349 #define G4  392 #define A4  440 #define B4  494 #define C5  523 char keys[4][4]={   {7,8,9,0},   {4,5,6,0},   {1,2,3,0},   {0,0,0,0}}; byte rowPins[] = {7,6,5,4}; byte colPins[] = {3,2,1,0}; Keypad keypad = Keypad(makeKeymap(keys),rowPins,colPins,4,4); int melody[] = {C4,D4,E4,F4,G4,A4,B4,C5}; int dl = 300; int buzzerpin = 11; LedControl lc=LedControl(8,10,9,1);  // Pin 8->DIN, 10->CLK, 9->CS(LOAD), 1 = No.of devices void setup()  {   lc.shutdown(0,false);     lc.setIntensity(0,5);    lc.clearDisplay(0);   pinMode(buzzerpin,OUTPUT);   digitalWrite(buzzerpin,HIGH); } void loop()  {   char key = keypad.getKey();   if ((key != ...

งานปฏิบัติที่ 8

รูปภาพ
งานปฏิบัติที่ 8 wiring diagram🔻 Code 01🔻 #include "LedControl.h" #define C4  262 #define D4  294 #define E4  330 #define F4  349 #define G4  392 #define A4  440 #define B4  494 #define C5  523 int melody[] = {C4,D4,E4,F4,G4,A4,B4,C5}; float beats[] ={1,1,1,1,1,1,1,1}; int buzzerpin = 11; int timestop = 70; LedControl lc=LedControl(8,10,9,1); // Pin 8->DIN, 10->CLK, 9->CS(LOAD), 1 = No.of devices void setup() {   lc.shutdown(0,false);   lc.setIntensity(0,5);   lc.clearDisplay(0);   int dl = 500;   pinMode(buzzerpin,OUTPUT);   int numnote;   numnote = sizeof(melody)/2;   for (int i=0;i<numnote;i++)   {     lc.setChar(0,7-i,'-',false);     tone(buzzerpin, melody[i],dl*beats[i]);     delay(dl*beats[i]);     digitalWrite(buzzerpin,HIGH);     delay(timestop);   } } void loop() { } Code 02🔻 #inc...

งานปฎิบัติ 7

รูปภาพ
งาน ปฎิบัติ 7 Key Pad wiring diagram Cod 1 #include "LedControl.h" #include "Keypad.h" char keys[4][4]={   {'7','8','9','A'},   {'4','5','6','B'},   {'1','2','3','C'},   {'E','0','F','D'}}; byte rowPins[] = {7,6,5,4}; byte colPins[] = {3,2,1,0}; Keypad keypad = Keypad(makeKeymap(keys),rowPins,colPins,4,4); LedControl lc=LedControl(8,10,9,1);  // Pin 8->DIN, 10->CLK, 9->CS(LOAD), 1 = No.of devices void setup()  {   lc.shutdown(0,false);     lc.setIntensity(0,5);    lc.clearDisplay(0);       } void loop()  {   char key = keypad.getKey();   if (key != NO_KEY)   {     lc.setChar(0,0,key,false);   } } Cod 2 #include "LedControl.h" #include "Keypad.h" char keys[4][4]={   {'7','8','9','A'}, ...